Tuesday, July 30, 2013

Tea Pot Card for a Tea Lover

Here's a how-to for a cute teapot card I made for an avid tea lover this past week. It's such a simple concept, so easy to make and looks super cute. I saw a similar thing on Etsy for sale and thought "I could totally make it myself" and did. Here's how...

Teapot Card
Teapot card


Things you'll need:
  • Scrapbook paper of your favorite teapot pattern
  • 2 different card stock papers to match or contrast the scrapbook paper - one for the back of the card and one for the message insert
  • Pencil markers and ruler
  • X-acto knife / pair of scissors
  • Glue / glue stick
  • Buttons, brads, stickers, ribbon etc. for adornment
  • Printer and printer paper for printing out the template (optional)
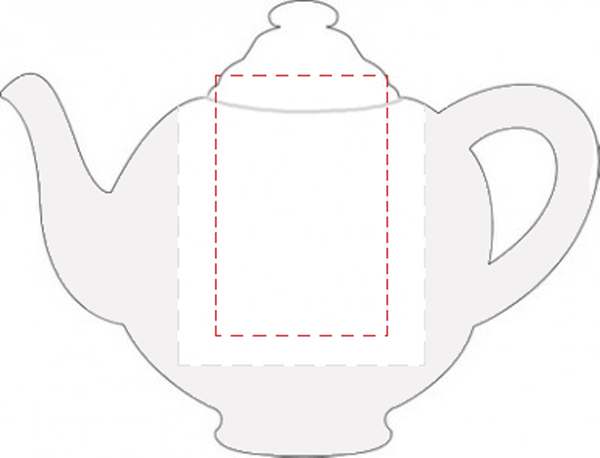
Teapot template
Teapot Card Template

Let's make it...
  1. Start off by printing out the shape of a teapot. You can use my template which has clear markings for gluing, which you will need later on. Make sure to scale it in your print preview.
  2. Cut out the template if you are using it, or just cut the shape of the teapot with lid on using a pair of scissors or X-acto knife.
  3. Lay the scrapbook paper on the card stock which you will be using for the back of the card and align them well. You might want to use paper clips to hold these in place so they don't move while you are cutting them.
  4. Using the template, trace the out line of the teapot and cut out the scrapbook paper and card stock while they are pinned together in place.
  5. Using a pair of scissors, cut off the lid of the teapot. Now you should have two parts, the actual teapot, and the lid separated from it. Keep the lid cut-outs aside for now, we will use them later.
  6. Using a pencil, mark a rectangle on the inside of your card stock to resemble the gray dotted rectangle in the template. Glue the card stock in the area that is shaded in gray and paste the scrapbook paper with the right side up over this. Make sure to leave the vertical unshaded rectangle in the center unglued to make a "pocket" for the card insert. Let this dry.
  7. To make the card insert, cut out a rectangle that is smaller than the gray dotted rectangle. You can use the red dotted rectangle from the template for reference. Make sure that this insert is at least 1/8" smaller in width as well as length than the "pocket" we made between the scrapbook paper and the back of the card.
  8. Glue the top end of the insert over the lid cut-out from the card-stock. Lay the other cut-out from the scrapbook paper over this and glue it down over the lid below, making sure you align them well. Let this dry.
  9. At this point, you should have one end of the insert pinched between two layers of the lid in such a way that the insert stays connected to the lid. If you have any extra material from the insert peeking out, snip it off carefully with a pair of scissors or an X-acto knife.
  10. Your card is pretty much done. You can adorn this with ribbons, buttons, lace, brads, colored ink... Just pick out whatever you fancy and go to town!
Teapot Card Open
Teapot Card Opened


Monday, June 10, 2013

Father's Day Card

Father's Day is right around the corner. So why not make something yourself instead of buying it at Hallmark to show your Dad how special he is? It's a fun and simple project, and will be a unique present for Daddy Dearest!


Things you'll need:
  • Card stock of your choice for the vest
  • Decorative paper for the outside of the vest
  • Craft paper for the shirt
  • Ribbon for the tie
  • Split pins or brads for buttons
  • Pens that write on dark paper
  • Pencil markers and ruler
  • Glue stick
  • Hot glue gun
  • Pair of scissors
  • Exacto knife or paper knife

Let's make it...
  1. Start off by folding your rectangular card stock paper into a gate fold. This is the base of your card.
  2. Glue the decorative paper to the top of the card with plain glue or a glue stick. Cut it in the center where the gate fold opens, and cut the edges to align with the folded card stock. Make sure you have some extra paper left over for the shirt collar, which we will make in step 7.
  3. Cut the craft paper in a square with the length of the side equal to the total width of the closed card and paste it on the inside as shown in the second photo.
  4. Let the glue dry completely.
  5. Using a light pencil marker and a ruler, mark triangles for the sleeves and the bottom cuts. Use a sharp pair of scissors or an exacto knife to cut out these triangles to give your card the shape of a vest.
  6. Take a 6" long piece of wide ribbon. Take about 1" section of one side of the ribbon and fold it in half. Roll the edges around to make it look like the knot of a necktie and hot glue it in place. Cut the bottom portion of the ribbon in a triangle to define the tail of the tie. Glue this to the top of the "shirt."
  7. Cut the remainder of the craft paper into two squares, each about 1"x1". Fold them into triangles and hot glue one triangle on each side of the tie to make it look like a shirt collar. Using the pair of scissors, cut off the extra bit of paper sticking out at the back / top.
  8. Use the brads to hold the corners of the collar in place, like buttons on an actual shirt collar.
  9. Stick a few more brads on the vest for the buttons and fold the ends over to secure them in place.
  10. Cut out little semi-circles of the same material you used for the vest to make vest pockets. You can stick a small piece of ribbon for a handkerchief in one of the pockets, or a small note.
  11. Your card is almost done. All that is left is that special message for Dad to be written on the inside of the vest, which I will leave completely up to your creativity!
PS: Here is another version of the card. Instead of the decorative paper for the vest, I used a sheet of felt to give it a flannel feel. If you are using felt, you will have to hot glue it since plain glue won't work.


Tips:
  • Depending on your liking, you may consider making a bow-tie instead of a necktie.
  • Whatever glue you are using throughout the process, please give adequate time for the glue to dry at each step before moving onto the next step.
  • If you don't have brads, you can try gluing on actual tiny buttons or make your own version of buttons from beads, play dough, or simply draw them on with colored pens.
  • When cutting out the arms and sides of the vest, make sure to cut the front and back together to align them.

Wednesday, May 29, 2013

Personalized Coasters

This post is inspired by something I found on another blog, but I made an easier version so it does not involve any stitching or printing on cloth.


Things you'll need:
  • Foam sheets
  • Mod Podge (decoupage)
  • Pair of scissors or pinking shears
  • Printer
  • Paper

Let's make it...
  1. Find pictures or images you like. For my coasters, I found pictures of postage stamps of different countries from Karen Horton (thanks Karen for the wonderful images).
  2. Resize them to the size you want. You can do this in the print preview. When you have them scaled to the desired size, print them out on regular printer paper.
  3. Cut the images leaving a 1/2" margin around them and paste them to your foam sheet with Mod Podge. Let dry for considerable amount of time (I let mine dry for about 2 hours but 20-30 min should be sufficient).
  4. Once the glue dries, use scissors to cut along the border of the image. I used pinking shears to get the postage stamp look.
  5. Apply a layer of Mod Podge using a paint-brush or foam roller. It might look milky, but don't worry, Mod Podge dries clear.
  6. Let dry till the Mod Podge looks clear and you can see the image. Now your coasters are ready to use with your cold beverages... Just in time for summer!
Tips:
  • Do not use your coasters with hot beverages.
  • It might be a good idea to brush a coat of Mod Podge on the edges so in case of spills, the paper won't get damaged.