Here's a how-to for a cute teapot card I made for an avid tea lover this past week. It's such a simple concept, so easy to make and looks super cute. I saw a similar thing on Etsy for sale and thought "I could totally make it myself" and did. Here's how...
 |
| Teapot card |
Things you'll need:
- Scrapbook paper of your favorite teapot pattern
- 2 different card stock papers to match or contrast the scrapbook paper - one for the back of the card and one for the message insert
- Pencil markers and ruler
- X-acto knife / pair of scissors
- Glue / glue stick
- Buttons, brads, stickers, ribbon etc. for adornment
- Printer and printer paper for printing out the template (optional)
Let's make it...
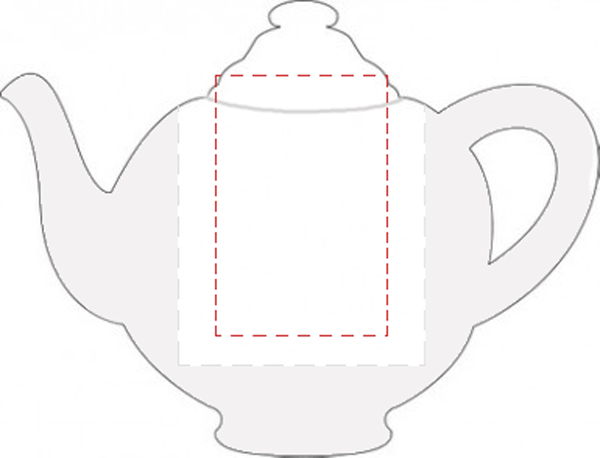
- Start off by printing out the shape of a teapot. You can use my template which has clear markings for gluing, which you will need later on. Make sure to scale it in your print preview.
- Cut out the template if you are using it, or just cut the shape of the teapot with lid on using a pair of scissors or X-acto knife.
- Lay the scrapbook paper on the card stock which you will be using for the back of the card and align them well. You might want to use paper clips to hold these in place so they don't move while you are cutting them.
- Using the template, trace the out line of the teapot and cut out the scrapbook paper and card stock while they are pinned together in place.
- Using a pair of scissors, cut off the lid of the teapot. Now you should have two parts, the actual teapot, and the lid separated from it. Keep the lid cut-outs aside for now, we will use them later.
- Using a pencil, mark a rectangle on the inside of your card stock to resemble the gray dotted rectangle in the template. Glue the card stock in the area that is shaded in gray and paste the scrapbook paper with the right side up over this. Make sure to leave the vertical unshaded rectangle in the center unglued to make a "pocket" for the card insert. Let this dry.
- To make the card insert, cut out a rectangle that is smaller than the gray dotted rectangle. You can use the red dotted rectangle from the template for reference. Make sure that this insert is at least 1/8" smaller in width as well as length than the "pocket" we made between the scrapbook paper and the back of the card.
- Glue the top end of the insert over the lid cut-out from the card-stock. Lay the other cut-out from the scrapbook paper over this and glue it down over the lid below, making sure you align them well. Let this dry.
- At this point, you should have one end of the insert pinched between two layers of the lid in such a way that the insert stays connected to the lid. If you have any extra material from the insert peeking out, snip it off carefully with a pair of scissors or an X-acto knife.
- Your card is pretty much done. You can adorn this with ribbons, buttons, lace, brads, colored ink... Just pick out whatever you fancy and go to town!
 |
| Teapot Card Opened |


